Blog Archives
Weekend 10 of Construction and The Big Move
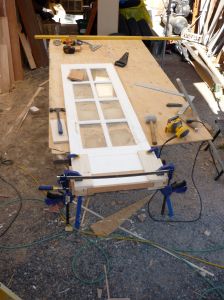
This was one heckuva weekend, with mad buttoning-up of things for travel on Sunday. The doors had been neglected until now as they require extra attention (such as custom door jambs) to install; the French doors were originally fixed glazed doors, and about 18″ too tall for the under-loft area, so they had to be carefully cut down, glued, and clamped, and a jamb made. The bottom sill of the French door jamb was made from scrap white oak, with a carefully-cut slope to it so that all water would drain (you can’t buy 4′ wide sections of metal threshold/sill material at the Big Box Store). It’s one of those niceties we will appreciate although it might not be obvious to the casual observer.
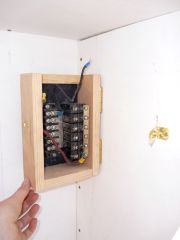
The 12v DC wiring did not have a functioning breaker panel to connect to, so the Ebay boat panels were torn apart, sanded clean (’cause they’re old and made of metal, not cheap plastic), and re-assembled with the proper breaker sizes (primarily 5-10 amp). We made a little housing for it so that the rear of the panel can be accessed for maintenance. The breaker switches are also the on/off switches in this case, which works fine. We think it looks steampunk, which is always good!
And in the process, gained great respect for Ace Hardware over other Big Box Stores – we always liked that store over the Big Box, and learned that particular bias from our respective dads. Coincidentally, it seems the place is staffed with DIY dads. Well, another reason why I love them: I called the plumbing and electrical specialty store in town, and after passing me around, found one guy who “kinda” knew 12v – by which he meant, he could discuss LED lighting with you, and recommended I visit the auto electric shop in town to get advice for real 12 volt stuff. I view that as good customer service, nonetheless. But I went to Ace first, just in case, found a great selection of wire for my needs (10-16 AWG, or American Wire Gauge, wire), and the first guy that walked by I posed the same question to: “Do you know anything about 12 volt?” and he answered, “I know all about 12 volt,” as he pulled wire. This surprised me. I asked why, and he said he had previously wired RVs for a living! At this point I freaked out and asked him all the questions I could, since he was the first person I met who knew anything! Here are the highlights:
1. What is the recommended treatment for wire junctions/terminations (i.e. electrical boxes)? Answer: none. You can end the wires in the middle of the wall, just put a couple wire nuts on the bare ends, no box needed.
2. Does it matter if you use larger gauge wire than required for the load or distance? Answer: nope, only a problem with smaller gauge wire than required. It’s just a little more expensive.
3. Where is the best place to get 12v wiring? Answer: auto supply stores often sell rolls of 14, 16, and 18 gauge wire by the 25-50′ for cheaper than by-the-foot wiring. The larger or smaller stuff, get here.
4. Does the color matter for positive and negative? Nope, whatever colors you want. Many people use red and black, but any color will do. Just stick with the same colors so you don’t get confused.
5. Why doesn’t everyone use 12v systems when they are so cool and easy to use?? Answer: The power source has to be close due to losses over distance. Otherwise, no good reason. If you get shocked, “It’s not even bee-sting material.” Fire hazard is low. My note: You do, however, need to use 12v – approved switches rather than regular 120v switches due to the larger amperages, as they can actually melt the terminals of a regular switch if they arc. RV and marine stores sell 12v rocker switches, and the plain ol’ metal toggle switches seem to be used with no problems, either.
So I was stoked. If we ever do anything with the Palomino chassis, I’m doing all 12v DC, just for the fun of it. And maybe I can get my sister involved, too, as it seems 12v DC systems are a great introduction to electrical systems. Would have made my high school physics class WAY more interesting…
And we also installed the 120v, 30 amp RV electrical inlet and water inlet, in the newly lined utility closets (for vapor and spark protection). Since we are poor and don’t have our power center or inverter/charger for self-made power yet, but want to be able to plug-and-play later with solar, wind turbines, or generator, we put two gratuitous junction boxes in the utility closet and ran extra conduit through them, so that it will be easy to add those components later without having to try to run more conduit and have a messy cabinet. Messy electrical closets are ugly and bother me.
Word to the wise: you’d think there’s only one kind of 30 amp RV AC inlet. Wrong. There are two kinds – both have three prongs, but one is a regular plug and the other is a twist-lock variety. Both work, but they are not interchangeable, although they make adapters. The twist-lock variety seems a little more secure, so many of the new 30 amp RV cords have a female locking end and a male non-locking end, like this. Make sure you know what you are getting. I didn’t, and was surprised when I opened the inlet after getting it in the mail. Also, when I talked to Monty Taylor regarding “separable” vs “non-separable” power supply for RV inspection, he said he doesn’t care so long as it’s done well. However, I didn’t think about male vs female receptacles/terminals when I bought one the first go-round. I got a 30a regular 3 prong receptacle (female) for the house. Well, that doesn’t work. You need the plug (male) end installed in the house, so that when you hook up a cable, the male end is free to plug into your power source receptacle and the female end plugs into your house. Can’t have a cord with two male ends, can we? Duh. Good news: if you’re like me and you’re cheap, and you saved the cord from the pop-up camper you ripped apart (those power cords are $50 and up man!) that was permanently attached so one end is a stub with raw wires sticking out, you can buy male and female adapter heads online and at any RV store for less than $20. So that is what I did. I bought an adapter for my twist-lock 30 amp inlet to that we can use either type of plug, and bought a $17 female adapter head with standard RV 30 amp layout to attach to my raw cord. Clear as mud? Yeah, me too. Result is, we are ready for any type of 30 amp power supply! Mwaha!
Next, the utility closet got its cover and doors, and all the window and door openings were covered with plywood for the drive. Hurricane clips were attached from rafters to top plates to secure the roof, and we also added some straps to the front eave, for upward forces while driving.
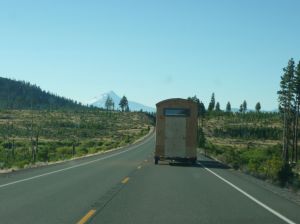
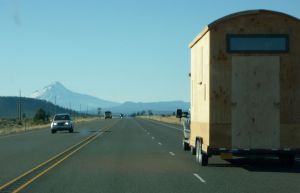
For the moving day, procure yourself a heavy-duty truck to do the pulling, and a good, optimistic friend or family member to drive behind you and call periodically to tell you nothing has fallen off. And as Dee Williams says in her e-book, to also tell you, “It’s so cu-ute!” and soothe your nerves. In our case, have the calm ones in the big truck, and the documenters following behind (only if not driving, of course) and providing caravan-afforded protection from tailgaters and other silly people.
For those who look at our house and say “It’s so tall! Are you sure the wind won’t blow it over?” the answer is that it did great on the road. We had no concerns driving it whatsoever, and in fact it surprised all of us, in a very welcome way. The only thing that wobbled was the license plate, because it’s attached by a flimsy plastic bracket on the top only, which we can handle. Nothing flew off, nothing was broken. Sigh.
We do recommend using a truck weigh station to find out how much your trailer weighs, while you’re on the road anyway. You don’t have to pay, it isn’t hard, and the scales are always on, even if the station is closed. We found out, after much panicked calculations, that our house weighs about 800 more than we had projected, at 7,300 lbs. For those contemplating a rounded roof such as ours, do keep in mind that you will have considerably more wall height, and therefore weight, compared to a typical Tumbleweed gabled house. We did not consider that in our calculations. Oops. We are now left with less weight to work with in finishing, but with care we will still come in under our weight limit. If you look up Colin’s Coastal Cabin on The Tiny House Blog, he has a shed roof but similar high walls, and he came in at 9,000 lbs. His house is gorgeous and well-made. So be aware of weight! It adds up in a sneaky sort of way.
Now, getting our tiny house onto our narrow lot from our narrow lane with a large truck and rented power mover, that was a long story, to be discussed at a later date. The happy ending is: our house is now resting comfortably on our lot, with jacks to stabilize, and many neighbors already stopping by to ask questions, only 10 minutes away now instead of hours. About three weeks left until we move in!


